Tuesday, January 8, 2013
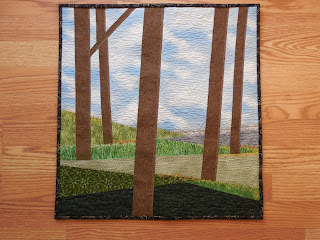
Spring Trees quilt
Wow! A whole weekend to myself in between customer quilts! I had seen a beautiful quilt on Pinterest that was based on a book called Winter Trees by Jane Kennedy. I was dying to try this out, so I thought this would be the perfect small project for the weekend. My plan is to make a large wall hanging for my kitchen, but I figured it was best to start small and get a better understanding of the pattern. This book is very detailed and was a bit daunting at first. Lots of text, lots of photos.
I opened up the armoire in anticipation. Hm, lots of great whites and grays and blues, but nothing that came together value-wise. Grrrr.... Not enough fabrics that go together for a winter scene. Instead, this quilt is spring trees:)
The whole pattern is actually very basic, but it took me a while to get my head around it. Now that I have made one, I don't think I will have any trouble making another. Jane's instructions are very good and very detailed. I should probably give myself a little bit more wiggle room as far as fabric. Once I drew the design, I forgot about seam allowances. Had to trim some sections down a little more than I wanted. Hey, this is why we do sample quilts, right?
I tried something new this time when it came to pinning. Carrie P. sent me a link about a new option for pinning. The product is called Pinmoor. The whole idea behind this is to speed up the pinning process for those of us who don't have a longarm, but spend an hour on the kitchen floor opening and closing safety pins. These are little rubbery things that look kind of like earplugs. You take one of your own pins, stick it through the quilt, and then pop this plug on the end.
I ended up with a multi-colored set, and some of them happen to be see through. You can see how the sharp end of the pin is stuck into the plug, saving your fingers from getting stabbed.
I like the whole idea of this. The plugs stick on really well. There seemed to be no danger of them coming off accidentally. The lady who designed them mentioned that one went through the wash and stayed in place. The only problem I had was that they bunch up the fabric a little each time you put one in. You can see the little 'hill' in the photo above. This probably wouldn't make much difference for an edge to edge design where you are working from the center outward, but I had a little trouble with the quilt not laying as smoothly with this project. I quilted the trees first and had to be careful with the space in between afterwards.
Will have to give these plugs another try with a different style of quilting.
The quilting was a lot of fun on this one. I quilted 'grass' on the lighter greens, but tried to to break it up a bit on the other sections. I didn't want it all grass. The light green/brown ended turning into a path of sorts, with horizontal quilting.
I quilted some blobby 'clouds' in the sky and tried something akin to rocks on the wall. I started off with a more round shape, but in retrospect, the rocks need to be more horizontal I think. I also tried to do some shading on the trees using a lighter brown as if the sun was coming into the trees from the right side of the quilt.
I also wanted to give the quilt more color to have it look more spring-like. Daffodils or something along those lines. I ended up settling for nebulous blobs of color that would show up more from a distance. Each of those tiny little swirls are about 1/8 of an inch. It is extremely difficult to actually quilt the shape of a flower at that size. Thought the color blobs would work better.
Chris picked up her baby quilt before I bound this quilt and she gave me some great advice. Normally, I would cut the binding 2 1/4" wide. She suggested cutting 5" strips to help it lay better against the wall. You sew it to the front just like you normally would, but it just goes further onto the back and stabilizes it a bit better. Chris also showed me a better way of closing the binding strips so I don't end up with a bump where they come together. I didn't quite get the closure right, since the strips were so much wider than I am used to. I just did a straight seam at the join instead of an angled one, but the binding turned out great anyway. I love it!
And the best part of all is that you don't have to make an extra hanging sleeve. When you sew the binding to the back, just leave the two ends open at the top, and voila! Hanging sleeve! Amazing! Thanks so much Chris! I think I'll be using this method for all my small wall quilts from now on.
Time to push my sewing cabinet up against the kitchen table and start quilting my first t-shirt quilt.
Subscribe to:
Post Comments (Atom)


This is a lovely quilt. All the various quilting patterns are wonderful!
ReplyDeleteHave a great day.
Always, Queenie
so you bought some of those pin things.
ReplyDeletegreat idea for the binding and sleeve. thanks for sharing.
your quilt is beautiful!
Beautiful as always!
ReplyDeleteYou did a wonderful job. I have always wanted to do this quilt. I love your quilting.
ReplyDelete