Laura came to me with a quilt that she had started 20 years ago! She had taken a class and had pieced this all-flannel lap quilt and started quilting around some of the squares. Then the teacher left town and this quilt has been languishing in a dark cabinet somewhere:) Laura decided it was time to get this quilt finished so she brought it to me.
Have a look at these plastic ties! Apparently, this was the fashion for basting when Laura took the class. The upside was that I didn't have to baste the quilt and I could get started quilting right away. The downside was having to cut them all off as I went along. I was terrified that I would hit a piece of plastic with the needle or cut the quilt trying to get them off. I was fortunate not to experience either of those things, but they still keep popping up on the kitchen floor in the most unexpected places:)
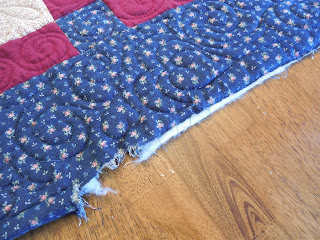
So, anyway, Laura calls me up a few days later. Help! she says, my dog ate my quilt! Can you fix it?
Hm, that really is the question, isn't it? Her puppy, a humongous, innocent-looking, white Great Pyrenees named Lady, really did a number on this quilt.
Doesn't she look sweet and harmless;)
And this corner is no longer even in existence! I know it is possible to 'quilt as you go', so I looked online to see how it is done. The video I watched presumed that there was actually backing AND batting fabric upon which to 'quilt' pieces as you go. Obviously not relevant in this case:)
So what did I do? I trimmed off the bad corner leaving a nice triangle. I cut out a piece of backing fabric. Stitched them right sides together and then did the same with the border fabric. Of course it always works out that the fabric you need is the fabric you don't have. Laura had plenty of leftovers of everything but the dark blue. Fortunately, she still had some of the other blue, so I used that one. I sandwiched a piece of batting in between and quilted over the whole piece.
Then I bound it normally, just folding the ends of the binding under 1/4".
I pieced some patches to cover where the rips went across seams and then turned them under and topstitched them and quilted the design over the whole thing again.
You can see the seam lines, but it isn't as noticeable as it could be. In fact, it took me a second to find the patches so I could show Laura what I had done. All in all, success I think:) Now I can self-style myself as a restorer, hehehe. No thanks! Think I'll stick to quilting and leave restoration to the professionals, barring any emergencies:) Thanks Laura!


Wonderful rescue! I have done similar when one of our dogs would "love" a quilt! One of my first quilts still bears marks from one of our beloved hounds who is no longer with us.
ReplyDeleteYou are a genius!!!
ReplyDeleteI have some patch jobs on mine too, if you want perfection don't have dogs! Great fix!
ReplyDeleteLove the Pyr, have a granddoggy named Lulu, sweet and innocent mostly but a fierce guardian as well. Gotta love the pups!
Chris
Wow! you are just so smart. Way to go fixing that quilt. I know Laura must be pleased with the results.
ReplyDelete