Saturday, January 26, 2013

Erin's fish quilt


Erin brought me this colorful baby quilt. There are loads of pieced fish, big and little. Her piecing was amazing. Very precise. She liked the swirly pattern, so I quilted that all over the blue, from edge to edge.


I'm impressed that these photos came out. I had to take pictures inside because of all the ice. They are better than I expected:)


I brought out my piece of clear plexiglass and tried several designs before I settled on this one. I wanted to make the fish look more 'real', rather than just echo the shapes. I quilted each one with a bright contrasting colored thread, adding some fins and then stitching in the ditch around the whole fish to keep it tacked down nicely.


I love the colors! This is such a bright and cheerful quilt! Thanks Erin!


Monday, January 21, 2013

Fancy quilted table runner

I just finished one client quilt and needed another quick project of my own to experiment with. I decided on a table runner since they can be quilted heavily and aren't too large. I wanted to try some tighter designs that I have been collecting on Pinterest.


I fell in love with these Joel Dewberry fabrics online and ordered some. Of course, they don't go with any of my decor, but I couldn't resist. Love the birds!


You can see the quilting a lot better on the back. I happened to have some black linen that I had picked up cheap somewhere. How did I not know about black linen? It is wonderful for backing! I have used black cotton before and ended up with loads of little piece of batting poking through. I know I can solve this problem by using black polyester batting, but I really prefer cotton.

I didn't have a single bit of batting come up through this linen. It was great to work with. I'll definitely be using it for backing again!


I marked the perimeter lines with blue water soluble marker and put a couple of dots in to measure out the center design. I got the idea for the center design from Judi at Green Fairy Quilts.

Then I threw in a row of pearls because I think they look so amazing and it is never a bad thing to practice doing those. I put in some tight swirls for contrast and again, more practice. I had done these on another quilt and wanted to work on the consistency of the line and the spacing in between.

I have been dying to try out these Asian feathers from Carla Barrett's blog, Feathered Fibers. I had repinned them from pinterest, but I can't find them on her blog. They were so much fun! I had a little trouble in the inner corners, but I will definitely be using these again. Beautiful!

All I have to do now is repaint my kitchen gray. The light blue walls don't go with my new runner:)

Saturday, January 19, 2013

Chris' tulip quilt


Chris gave me free reign on this one. She wanted another edge to edge design. Hm, kind of looks like the Starship Enterprise with the shading. Still working on my photography skills. The weight bench was casting a shadow from the deck:)

I had seen this swirly feather design on Jenny's blog jennysdoodlingneedle.blogspot.ca and Kathy at Tamarack Shack had also tried it on one of her quilts.


I used Kathy's photo to draw a couple of these swirls to get the hang of it. I have only quilted feathers a few times, and I wasn't too happy with my sausage-looking feathers in the past, so I thought this would be a good way to practice.


This pattern was so much fun! You start with a swirl, quilt feathers back up around it, and then echo it once or twice, depending on which direction you want to get back to.


Thanks Chris!

Thursday, January 17, 2013

Shirley's quilt


Shirley brought me a 63 x 63 stack and whack quilt that she had done in fall colors.

 
I filled in the background with stippling.
 

I quilted a leafy swirl pattern on the sashing.


Shirley picked a nice orange thread for the pinwheels, but after I quilted the motif once around, I could see that it wasn't enough. There needed to be more quilting on the pinwheels so they would lay properly and fit in with the rest of the quilting. So I echoed the design in brown. It is much easier to see the quilting from the back.
 
Thanks Shirley!

Thursday, January 10, 2013

Crazy organized!

 
Very excited about my Connecting Threads delivery today. Carrie P. introduced me to these great affordable cotton threads, priced at only $2.49 for a 1200 yard spool! They are great to work with and are very smooth for machine quilting. Sure, there's a bit of lint, but it is not excessive and since I clean out the bobbin case every time I change the bobbin anyway, it doesn't give me any trouble. 
 

I was at Joann Fabrics the other day and used one of my 50% off coupons to buy another spool stand. My two little ones are almost filled up with Mettler threads. This thread is fine, but goodness! It is expensive. Convenient though, since Sewingly Yours sells them just up the road. My thought process is that I build up my stash of Connecting Threads cotton so I don't have to worry about matching a color or having enough of it.

I just had a quilt delivered and the best match I had for color was a burnt orange. Unfortunately, it was a single spool of Gutermann cotton, at only 110 yds each. That is definitely not going to complete a large wall hanging. Hence the reason I was at Joann's. There were 8 spools left of this color and I bought them all. In comparison, these were $2.05 each. So now the goal is to have enough large spools on hand, that I don't have this problem. And lots of color variety.


The only problem that I can see is that these Connecting Threads spools are not labeled other than the plastic on the outside when it arrives. After the first time you use it, there is no way to tell exactly which shade it is. This is my solution. The catalogue came with perfectly sized squares with a photo of the color and the corresponding number. I cut them all out and arranged them by color on my new stand.


Clear tape is great! Now, unless one of the kids overturns the stand, sending said thread flying across the kitchen, I know which one to reorder when I am about to run out. As you can see, there is plenty of space for more.

Feeling good. Thread organized, customer quilt pinned, laundry done, floors cleaned. I might tackle my son's room next, but I think I'm just going to join the kids on the couch for Harry Potter. Friday: spend the whole day quilting:)

Wednesday, January 9, 2013

Karen's quilt

In Loving Memory of Bobby Miner
 

Karen brought me this t-shirt quilt she had made for a friend. Her friend's son was killed in an automobile accident at the age of 30. This quilt features six of his shirts.


At first she was thinking of having an edge to edge stipple using a black thread. I had a look online to look at some photos of other t-shirt quilts, and suggested using invisible thread instead, so the quilting wouldn't detract from the t-shirts. We agreed on invisible thread for the shirts, black on the black sashing and brown for the outer border.


I wanted to do something a little bit different for the sashing to break up the stippling. I settled on a back and forth squiggle with squares in between.


Karen had liked this circular swirl pattern as well, so I decided to go with swirls for the outer border, quilted in brown.


Thanks Karen!

Tuesday, January 8, 2013

Spring Trees quilt


Wow! A whole weekend to myself in between customer quilts! I had seen a beautiful quilt on Pinterest that was based on a book called Winter Trees by Jane Kennedy. I was dying to try this out, so I thought this would be the perfect small project for the weekend. My plan is to make a large wall hanging for my kitchen, but I figured it was best to start small and get a better understanding of the pattern. This book is very detailed and was a bit daunting at first. Lots of text, lots of photos.

I opened up the armoire in anticipation. Hm, lots of great whites and grays and blues, but nothing that came together value-wise. Grrrr.... Not enough fabrics that go together for a winter scene. Instead, this quilt is spring trees:)

The whole pattern is actually very basic, but it took me a while to get my head around it. Now that I have made one, I don't think I will have any trouble making another. Jane's instructions are very good and very detailed. I should probably give myself a little bit more wiggle room as far as fabric. Once I drew the design, I forgot about seam allowances. Had to trim some sections down a little more than I wanted. Hey, this is why we do sample quilts, right?


I tried something new this time when it came to pinning. Carrie P. sent me a link about a new option for pinning. The product is called Pinmoor. The whole idea behind this is to speed up the pinning process for those of us who don't have a longarm, but spend an hour on the kitchen floor opening and closing safety pins. These are little rubbery things that look kind of like earplugs. You take one of your own pins, stick it through the quilt, and then pop this plug on the end.


I ended up with a multi-colored set, and some of them happen to be see through. You can see how the sharp end of the pin is stuck into the plug, saving your fingers from getting stabbed.


I like the whole idea of this. The plugs stick on really well. There seemed to be no danger of them coming off accidentally. The lady who designed them mentioned that one went through the wash and stayed in place. The only problem I had was that they bunch up the fabric a little each time you put one in. You can see the little 'hill' in the photo above. This probably wouldn't make much difference for an edge to edge design where you are working from the center outward, but I had a little trouble with the quilt not laying as smoothly with this project. I quilted the trees first and had to be careful with the space in between afterwards.

Will have to give these plugs another try with a different style of quilting.


The quilting was a lot of fun on this one. I quilted 'grass' on the lighter greens, but tried to to break it up a bit on the other sections. I didn't want it all grass. The light green/brown ended turning into a path of sorts, with horizontal quilting.


I quilted some blobby 'clouds' in the sky and tried something akin to rocks on the wall. I started off with a more round shape, but in retrospect, the rocks need to be more horizontal I think. I also tried to do some shading on the trees using a lighter brown as if the sun was coming into the trees from the right side of the quilt.


I also wanted to give the quilt more color to have it look more spring-like. Daffodils or something along those lines. I ended up settling for nebulous blobs of color that would show up more from a distance. Each of those tiny little swirls are about 1/8 of an inch. It is extremely difficult to actually quilt the shape of a flower at that size. Thought the color blobs would work better.


Chris picked up her baby quilt before I bound this quilt and she gave me some great advice. Normally, I would cut the binding 2 1/4" wide. She suggested cutting 5" strips to help it lay better against the wall. You sew it to the front just like you normally would, but it just goes further onto the back and stabilizes it a bit better. Chris also showed me a better way of closing the binding strips so I don't end up with a bump where they come together. I didn't quite get the closure right, since the strips were so much wider than I am used to. I just did a straight seam at the join instead of an angled one, but the binding turned out great anyway. I love it!


And the best part of all is that you don't have to make an extra hanging sleeve. When you sew the binding to the back, just leave the two ends open at the top, and voila! Hanging sleeve! Amazing! Thanks so much Chris! I think I'll be using this method for all my small wall quilts from now on.

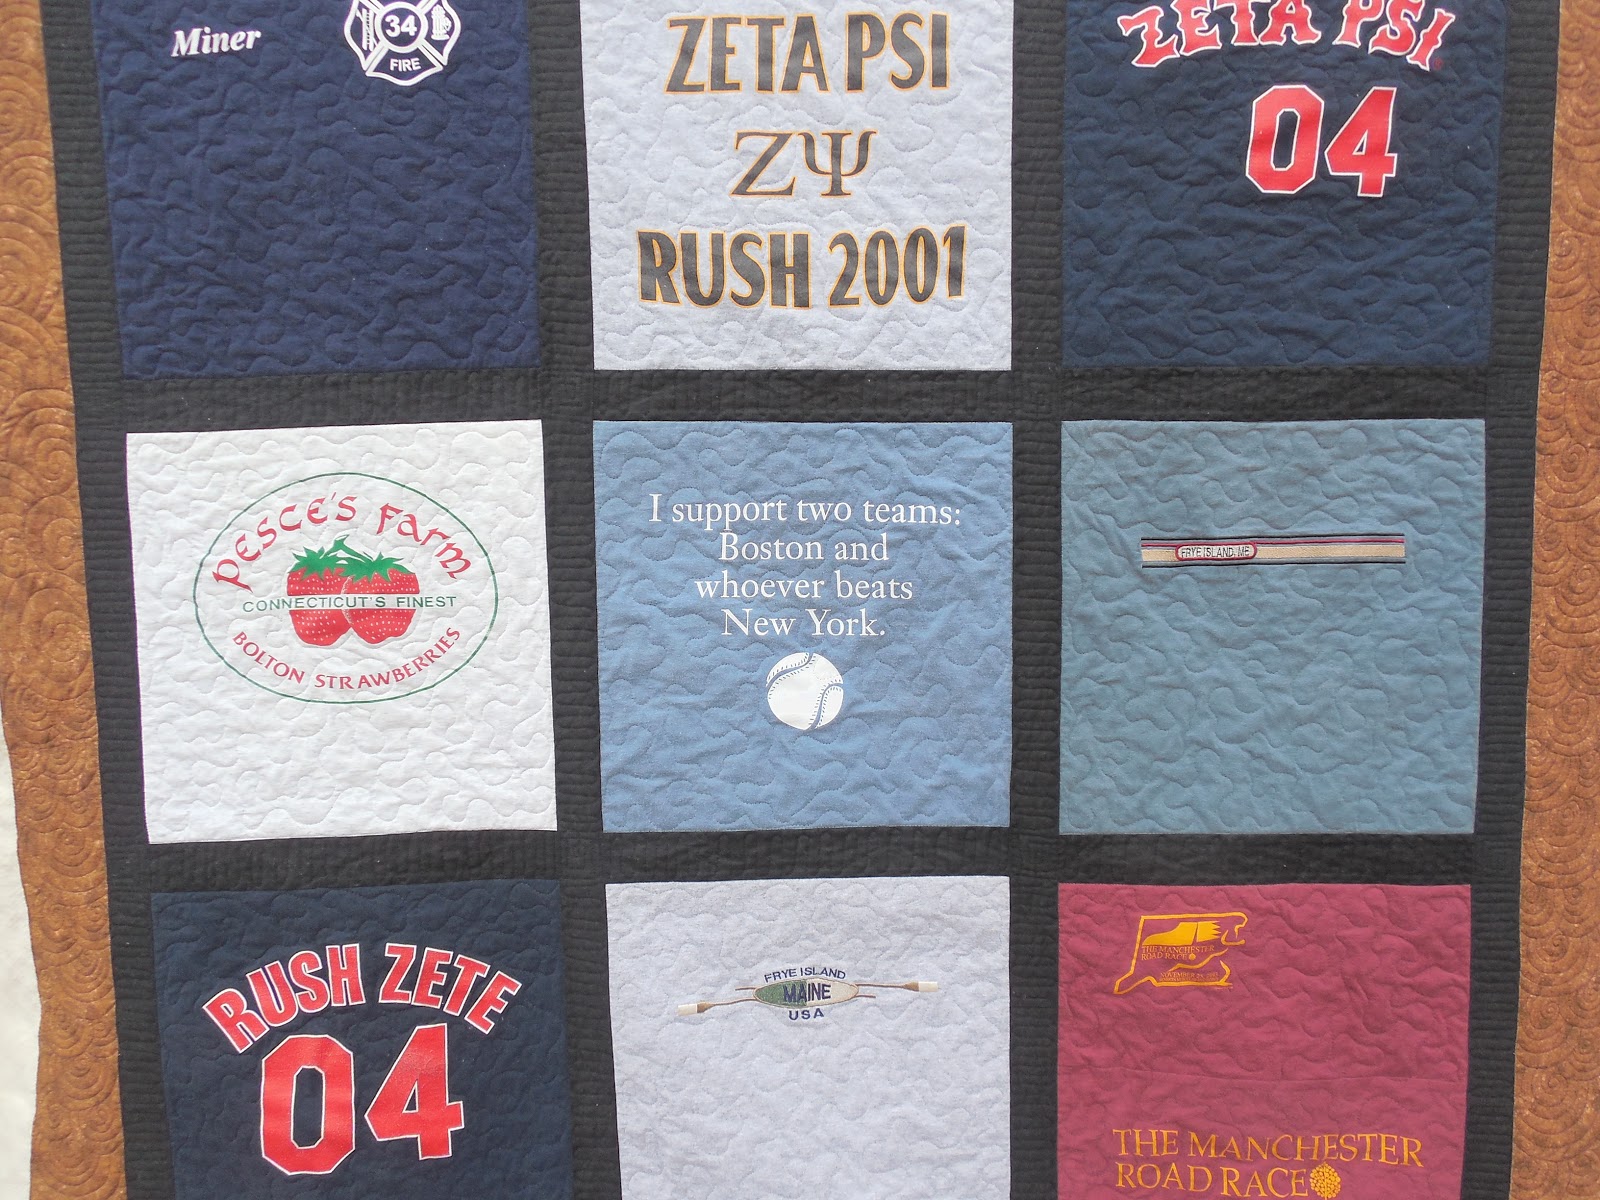
Time to push my sewing cabinet up against the kitchen table and start quilting my first t-shirt quilt.

Saturday, January 5, 2013

Chris's quilt


Chris emailed me after seeing Marianna's quilt. She wanted a similar feel for her baby quilt: loose quilting and an edge to edge design. She left the quilting design up to me. I saw some paisley quilting online and decided to give it a try, along with some swirls and a sort of swirly flower design.


I alternated between the three patterns, trying to vary them as I went along. The best part about this design is that there is no marking involved. I started in the middle and worked my way out and around, spacing out the floral swirl and paisleys and using the small swirl to get me to where I wanted to start the next design.


Thanks Chris!

Friday, January 4, 2013

If you give a man a challenge...

I don't know how all this got started, but my youngest, who is 4, requested a tent of some sort for his bed tonight.


The next thing I know, my husband is rummaging around in the basement, sneaking past the doorway in the hopes that I won't see what he is up to:) After a while, I peeked into my son's room to see a 'cave' over his bed. My husband used the rejected legs of a previous homemade microwave stand to prop up the frame of a Papasan chair that has been sitting in the basement for years. Then he threw a quilt over the whole thing. My son is ecstatic! Oh, I have just been informed that it is not a cave, but a spaceship.

And of course, my middle daughter wants one too! What to do? Only one Papasan frame, hmm....

Apparently we have plenty of PVC pipe down there. Rachel now has a frame over her bed as well. I'm trying to keep her from putting her lamp in there. Must be time to break out the flashlights.


Now the oldest is jealous. She wants a tent too! Wonder what Steve will come up with next...